이번에는 사용해볼 기능은 파일 업로드를해볼것입니다.
1. 단일 파일업로드
2. 다중 파일업로드
파일 업로드에 대한 순서는 이렇습니다.
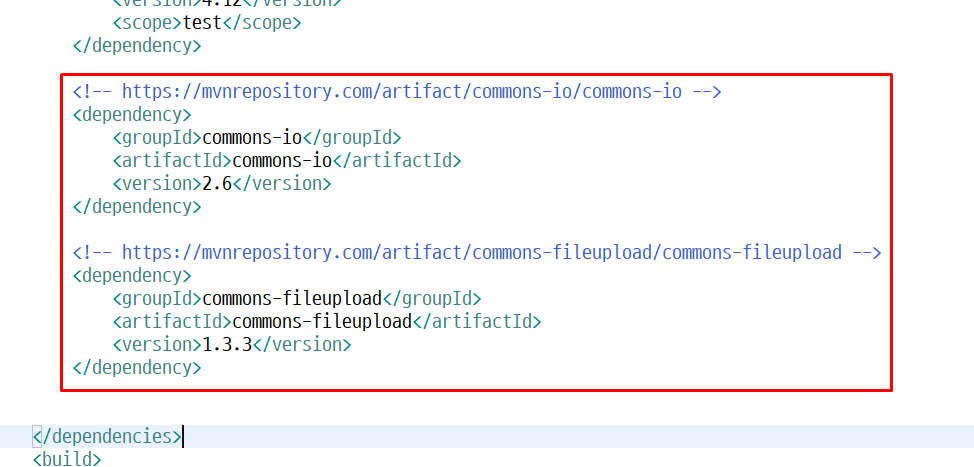
1. 파일 업로드 하기 위해서는 pom.xml에 commons-io, commons-fileupload 라이드러리 추가
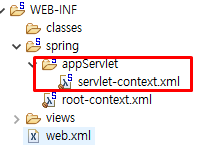
2. servlet-context.xml에 CommonsMultipartResolver bean 설정 필요
3. multipart로 전송 된 request에 대한 인코딩 처리를 해주어야 일반 인코딩 필터로 직접구현시 복잡하므로 스프링 에서 제공하는 인코딩 필터 사용함 필터는 web.xml에 등록함
기본 설정
1. pom.xml에 라이브러리 추가
commons-io
https://mvnrepository.com/artifact/commons-io/commons-io/2.6
commons-fileupload
https://mvnrepository.com/artifact/commons-fileupload/commons-fileupload/1.3.3
pom.xml
2개의 라이브러리 추가

2. commonsMultipartResolver bean 설정
아래의 경로 의 servlet-context.xml 파일열기

그리고 하단에 아래처럼 작성
maxUploadSize는 각자 수정 해도 무방 현재설정은 최대 100MB만 업로드할수있도록 설정해두었습니다.
*빈 등록 필수!

3. spring Encoding 등록
우선 web.xml 파일을 열어봅니다.

그리고 하단의 아래처럼 작성

이렇게하면 파일업로드 하기위한 기본설정은 끝났습니다.
이제 본격적으로 파일업로드 실습 진행해보도록하겠습니다.
순서는 다음과 같습니다.
1. 단일(1개) 파일 업로드
2. 다중(1~???) 파일 업로드
1. 단일 파일 업로드
FileUploadController.java
package com.memory.upload;

import java.io.File;
import java.io.IOException;
import java.util.ArrayList;
import java.util.HashMap;
import java.util.List;
import java.util.Map;
import java.util.UUID;

import javax.servlet.http.HttpServletRequest;

import org.springframework.stereotype.Controller;
import org.springframework.web.bind.annotation.PostMapping;
import org.springframework.web.bind.annotation.RequestParam;
import org.springframework.web.multipart.MultipartFile;

@Controller
public class FileUploadController {

	/* 1. 파일 한개만 업로드 하기 */
	@PostMapping("/single-file")
	public String singleFileUpload(@RequestParam String fileContent, @RequestParam MultipartFile singleFile, HttpServletRequest request) {

		// 1. 전송받은 파일 및 파일설명 값 가져오기
		System.out.println("singleFile : " + singleFile);
		System.out.println("fileContent : " + fileContent);

		// 2. 저장할 경로 가져오기
		String path = request.getSession().getServletContext().getRealPath("resources");
		System.out.println("path : " + path);
		String root = path + "\\uploadFiles" ;

		File file = new File(root);

		// 만약 uploadFiles 폴더가 없으면 생성해라 라는뜻
		if(!file.exists()) file.mkdirs();

		// 업로드할 폴더 설정
		String originFileName = singleFile.getOriginalFilename();
		String ext = originFileName.substring(originFileName.lastIndexOf("."));
		String ranFileName = UUID.randomUUID().toString() + ext;

		File changeFile = new File(root + "\\" + ranFileName);

		// 파일업로드
		try {
			singleFile.transferTo(changeFile);
			System.out.println("파일 업로드 성공");
		} catch (IllegalStateException | IOException e) {
			System.out.println("파일 업로드 실패");
			e.printStackTrace();
		}

		return "result";
	}

}
main.jsp
<%@ page language="java" contentType="text/html; charset=UTF-8"
    pageEncoding="UTF-8"%>
<!DOCTYPE html>
<html>
<head>
<meta charset="UTF-8">
<title>Insert title here</title>
</head>
<body>
	<h1 align="center">파일 업로드 하기</h1>

	<h3>single file 업로드</h3>
	<form action="single-file" method="post"  enctype="multipart/form-data">
		파일 : <input type="file" name="singleFile"> <br>
		파일 설명 : <input type="text" name="fileContent"><br>
		<input type="submit" value="제출">
	</form>
</body>
</html>
main.jsp에서 아래와같이 파일업로드후 제출을 누르면 파일업로드 컨트롤러로 이동하게됩니다.
jsp에서 파일업로드시 작성해야할 필수사항은 form 태그의 enctype="multipart/form-data" 입니다

그러면 일단 컨트롤러에서 받아와야할 매개변수를 작성합니다.

확인용으로 콘솔창에 띄워봅니다.
fileContent 는 파일 설명이고
singleFile은 파일 정보들을 가져오는 부분이고
request는 소스 경로를 가져오기위해 선언해두었습니다.
그후 파일 저장할 경로 설정하고 폴더 생성이필요하면 폴더생성 작업까지 진행합니다.

path는 resources 까지의 폴더경로를 나타내고
root에는 파일을 업로드할 폴더를 설정해두었습니다
그후 폴더 존재여부를 확인하기위해 file객체의 exists 메소드이용하여
폴더가 없으면 생성하고 폴더가 이미 존재하면 폴더를 생성하는것을 건너띄는 것을 의미합니다.
그후 파일을 업로드 할떄 db에 저장할값들을 뽑아옵니다 .

MultipartFile 객체의 메소드 이용하여 파일이름가져오고
ext는 확장자 명 뽑아오기 위해 저장한 변수입니다.
그리고 파일 중복성을 제거하기위해 UUID 의 랜덤값을 가져와 파일이름으로 설정합니다 .
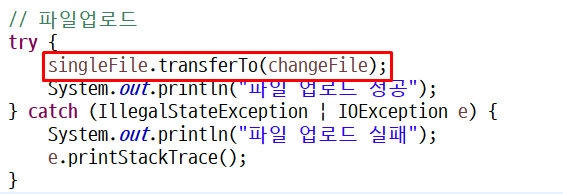
이제 이파일을 지정해준 폴더에 업로드를 해줘야합니다.

transferTo 메소드 이용하여 파일을 지정해줍니다. 예외처리는 필수입니다.
업로드를 진행후 resources/uploadFiles 확인해봅니다.
그럼 UUID로 변경한 파일이 저장된것을 확인할수있습니다.
저같은겨우는 5번 등록해서 5개가 있는 상태입니다.

2. 다중파일 업로드
FileUploadController.java
package com.memory.upload;

import java.io.File;
import java.io.IOException;
import java.util.ArrayList;
import java.util.HashMap;
import java.util.List;
import java.util.Map;
import java.util.UUID;

import javax.servlet.http.HttpServletRequest;

import org.springframework.stereotype.Controller;
import org.springframework.web.bind.annotation.PostMapping;
import org.springframework.web.bind.annotation.RequestParam;
import org.springframework.web.multipart.MultipartFile;

@Controller
public class FileUploadController {

	@PostMapping("/multi-file")
	public String multiFileUpload(@RequestParam("multiFile") List<MultipartFile> multiFileList, @RequestParam String fileContent, HttpServletRequest request) {

		// 받아온것 출력 확인
		System.out.println("multiFileList : " + multiFileList);
		System.out.println("fileContent : " + fileContent);

		// path 가져오기
		String path = request.getSession().getServletContext().getRealPath("resources");
		String root = path + "\\" + "uploadFiles";

		File fileCheck = new File(root);

		if(!fileCheck.exists()) fileCheck.mkdirs();


		List<Map<String, String>> fileList = new ArrayList<>();

		for(int i = 0; i < multiFileList.size(); i++) {
			String originFile = multiFileList.get(i).getOriginalFilename();
			String ext = originFile.substring(originFile.lastIndexOf("."));
			String changeFile = UUID.randomUUID().toString() + ext;


			Map<String, String> map = new HashMap<>();
			map.put("originFile", originFile);
			map.put("changeFile", changeFile);

			fileList.add(map);
		}


		// System.out.println(fileList);

		// 파일업로드
		try {
			for(int i = 0; i < multiFileList.size(); i++) {
				File uploadFile = new File(root + "\\" + fileList.get(i).get("changeFile"));
				multiFileList.get(i).transferTo(uploadFile);
			}

			System.out.println("다중 파일 업로드 성공!");

		} catch (IllegalStateException | IOException e) {
			System.out.println("다중 파일 업로드 실패 ㅠㅠ");
			// 만약 업로드 실패하면 파일 삭제
			for(int i = 0; i < multiFileList.size(); i++) {
				new File(root + "\\" + fileList.get(i).get("changeFile")).delete();
			}


			e.printStackTrace();
		}


		return "result";
	}
}
main.jsp
<%@ page language="java" contentType="text/html; charset=UTF-8"
    pageEncoding="UTF-8"%>
<!DOCTYPE html>
<html>
<head>
<meta charset="UTF-8">
<title>Insert title here</title>
</head>
<body>
	<h1 align="center">파일 업로드 하기</h1>

	<h3>multi file 업로드</h3>
	<form action="multi-file" method="post"  enctype="multipart/form-data">
		파일 : <input type="file" name="multiFile" multiple> <br>
		파일 설명 : <input type="text" name="fileContent"><br>
		<input type="submit" value="제출">
	</form>
</body>
</html>
다중파일은 단일 파일업로드가 많이 다르지않습니다
바뀐부분만 설명하겠습니다.
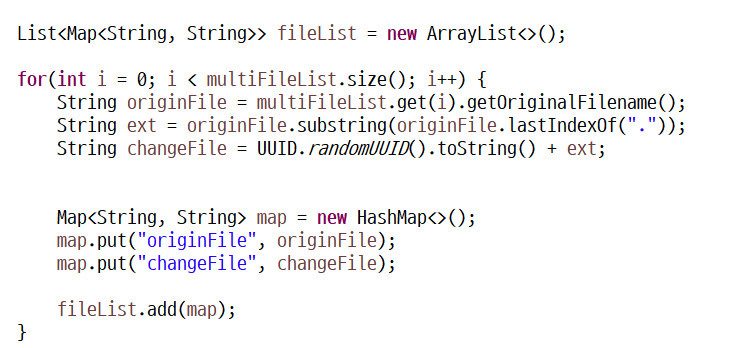
바뀐부분은 메소드의 매개변수가 List 타입으로 변경되었습니다.

그리고 한번이아닌 이미지갯수만큼 돌아 List에 map형식으로 저장하고있습니다.


이부분에선 파일 업로드도 반복문을통하여 이미지갯수만큼진행하고
만약 파일업로드시 실패(오류로인한) 하였을시
이미저장되어있던 이미지를 삭제 하는 기능입니다.
'프로그래밍 > Spring' 카테고리의 다른 글
| Spring - 16. session 사용하기 (0) | 2021.10.28 |
|---|---|
| Spring - 15. parameter 전송 및 받아오기 (0) | 2021.10.28 |
| Spring - 14. MVC mapping (0) | 2021.10.27 |
| Spring - 14. Web MVC Project 기본설정(어노테이션 버전) (0) | 2021.10.27 |
| Spring - 13. MVC 프로젝트 (0) | 2021.10.26 |


